In this post, you will find a free printable weekly planner layout to help you stay organized during the month, keep track of what happens during the day, or to use it as a creative outlet.
*** Update: This printable planner is not free anymore. You can find it in my Etsy shop.
Some time ago, you had a lot of things to do: appointments, work, home chores, gathering with friends and family.
But now, maybe you’re in the same situation as me: you stay at home.
Then, you may ask, why use a planner when I don’t have many things going on?
A planner can help you keep track of what you have to do but also what you make during the day.
As an example, I don’t have a gardening planner yet, and two weeks ago, I sowed my tomatoes.
I took the time to write this down in my planner and which day the seeds germinated. Next Spring, I will be able to look at this to help me remember when it’s time to sow in my region… if I get good results at the end of the Summer! 🙂
You can also use it as a creative outlet with stickers and washi tapes. You can scrapbooking some memories. You can even doodle in it each day or practice your hand lettering.
There are a lot of ways to use a planner even when you’re staying at home.
Be creative, and have fun!
Disclosure Policy… This post may contain affiliate links. If you click on my affiliate links and make a purchase, it doesn’t cost you more for the product. I will just receive a small commission. You can read my full disclosure policy.
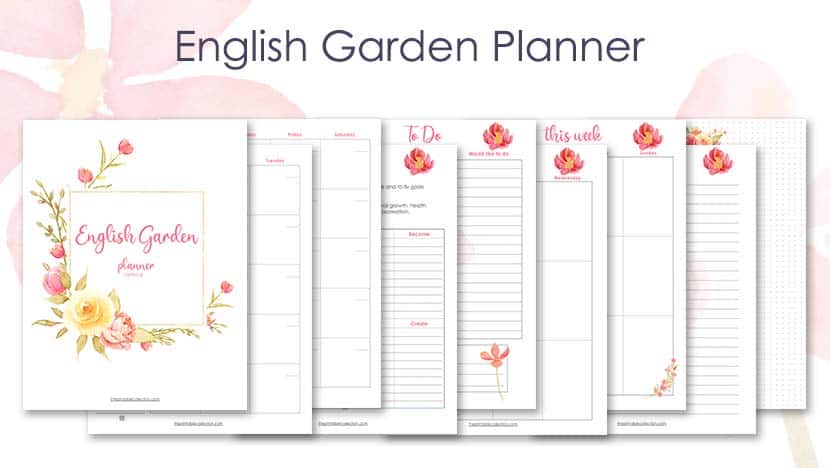
Here’s the printable weekly planner layout
This planner is ready for a month, you only have to print it. It is undated, so you can choose for which month and year you want to use it.
The PDF file has 24 pages:
- The title page
- A monthly calendar on two pages spread
- A reflection page to help you think about your life in different areas
- A To-Do page to write down all you have or want to do during the month
- Each week has two pages spread with all the weekdays
- Some notes pages
- Some dots pages
The dimensions are 8 1/2 x 11 inches, but you can decrease the size when you print it to fit a Classic Happy Planner or another format if you prefer.
–> Before printing the PDF file, please read the section for that below to get the best results possible.
French version also available.
Version en français également disponible.

You may also like…
Which is the best paper to print this planner
I like to print planners and journals on thick paper.
With this paper, I can write down on each page without the ink bleeding on the other side.
I have been using this paper for a moment now, and I’m so glad!
It’s really smooth at the touch and bright.
I found that using these Staedtler pens and these Stabio ones are the best choice over ballpoint pens. The ink from the pens dries very fast, and the ink doesn’t bleed on the other side.
Don’t forget to buy paper according to your printer: inkjet or laserjet.
How to resize for the Classic Happy Planner
If you want to resize the pages for the dimensions of the Classic Happy Planner, you can use Adobe Acrobat Reader DC to open the file and set some preferences.
To fit your Classic Happy Planner, you must print 82 % of the real dimensions.
Search for Custom Scale and replace the 100 % with 82 %.
You can also choose the pages you want to print.
And last, under the Custom Scale, you will find Print on both sides of paper. Checked the box.
In the Resource Library, you can find a template with black lines to help you cut your pages to fit perfectly the Classic Happy Planner.
Print this template, place a page you just printed over it, trace some lines, and cut.
Punch them with a punch for a discbound system like the Mambi one.
How to resize for the A5 format
Now, if you prefer a planner in the A5 format, here’s what you can do.
Using Adobe Acrobat Reader DC, you can print your planner as a booklet, so each page will be in the right order on both sides when you cut them in half.
Here’s what you have to do.
1- Click on the printer icon, or choose File –> Print in the menu.
2- In the Pages to Print area, select All prints pages from front to back.
3- In Page Sizing & Handling and click on Booklet.
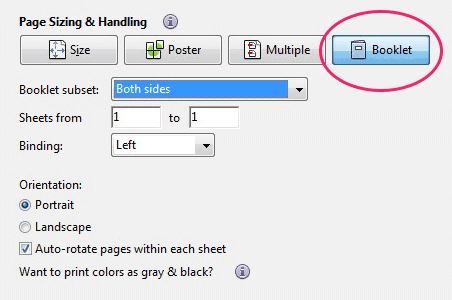
4- Let the choice “Both sides” in the Booklet subset.
5- Don’t change the numbers in the Sheets from boxes.
6- Select Auto-Rotate Pages to automatically rotate each page for the best fit in the printable area.
Cut each page in the middle and rearrange the order of them.
Punch holes and place in your planner.
Ready to plan for a new month?
Print it, and be creative in the way you use this planner!
Monique
You may also like…
Share this printable on Pinterest. Pin it on your favorite board!